UnicornStore Architecture
Objective
Throughout the entire workshop we will be use the following reference application called the UnicornStore. In this section you will get an overview about the inner workings of the app.
1. Introducing the UnicornStore
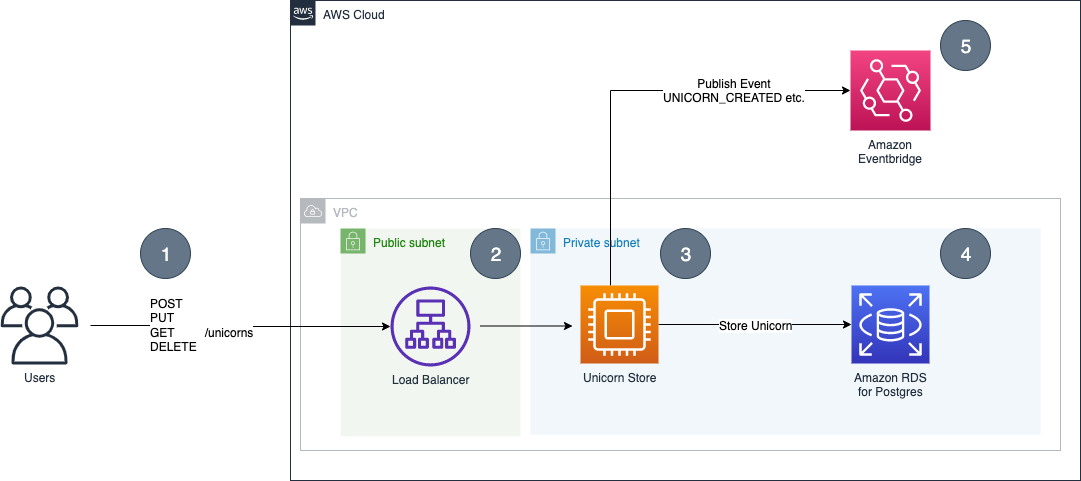
The UnicornStore is a Spring Boot 3 Java Application that provides Create-, Read-, Update-, and Delete-(CRUD)-Operations for Unicorn-Records. It stores them in a relational database running on Amazon RDS PostgreSQL and afterwards publishes an event about this action to Amazon EventBridge.
In a traditional non-Serverless and non-Containers setup the application could have been hosted like this:
-
(1) End-user can interact with the service via a REST-API that provides basic CRUD operations
- POST
/unicorns- Create a new unicorn - PUT
/unicorns/{id}- Update an existing unicorn - GET
/unicorns/{id}- Retrieve an existing unicorn - DELETE
/unicorns/{id}- Delete an existing unicorn
- POST
-
(2) Usually a load balancer / reverse proxy acts as an entry point to the system and provides basic features such as TLS-termination and load distribution.
-
(3) The application itself is not directly exposed to the internet and can be any kind of compute (EC2-Instance / VM / On-Prem server).
-
(4) The application communicates with the database to store the Unicorn-Records. Depending on the service, this can be in the same subnet & VPC or in different ones.
-
(5) Finally the application publishes an event about the action e.g.
UNICORN_CREATED.
2. Inside the Java Code
You can also inspect the code directly in Cloud 9 in the /unicorn-store-spring/src folder.
The example application in this workshop tries to find a balance between simplicity and comparability to a real world example. The application therefore includes basic features such as Input-Serialization, Exception-Handling, Object-Relational-Mapping and the usage of an additional SDK. The following diagram provides an overview of the classes and features used inside the UnicornStore:
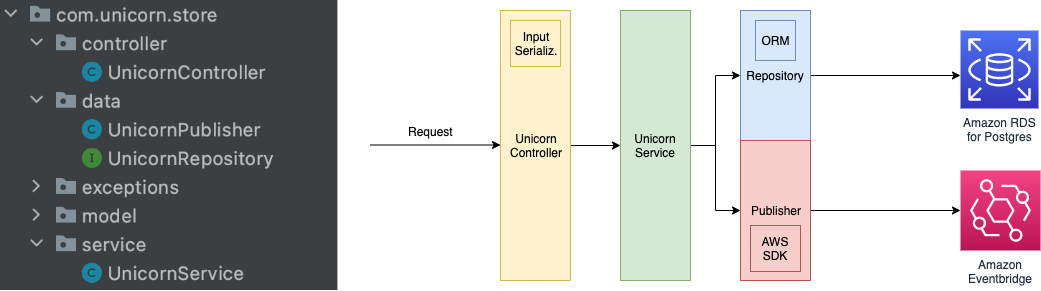
To get a better understanding how the components work together you will now walk through an example where a user requests to create a Unicorn (POST Request):
The UnicornController accepts the requests and directly provides it as a unicorn object (Input Serialization).
It has the additional responsibility to catch the exceptions that might happen in the further processing to provide a
meaningful message and HTTP-Code to the end user (Exception-Handling). Upon successful processing the controller returns
the result object and the proper HTTP-Code via a ResponseEntity.
@PostMapping("/unicorns")
public ResponseEntity<Unicorn> createUnicorn(@RequestBody Unicorn unicorn) {
    try {
        var savedUnicorn = unicornService.createUnicorn(unicorn);
        return ResponseEntity.ok(savedUnicorn);
    } catch (Exception e) {
        logger.error("Error creating unicorn", e);
        throw new ResponseStatusException(INTERNAL_SERVER_ERROR, "Error creating unicorn", e);
    }
}
The UnicornService passes it to the UnicornRepository which
is a default implementation of the CRUDRepository provided by Spring Data
and afterwards calls the UnicornPublisher to publish an event.
public Unicorn createUnicorn(Unicorn unicorn) {
    var savedUnicorn = unicornRepository.save(unicorn);
    unicornPublisher.publish(savedUnicorn, UnicornEventType.UNICORN_CREATED);
    return savedUnicorn;
}
UnicornRepository:
@Repository
public interface UnicornRepository extends CrudRepository<Unicorn, String > {
}
The UnicornPublisher serializes the object and uses the AWS SDK to publish an event to Amazon EventBridge:
public void publish(Unicorn unicorn, UnicornEventType unicornEventType) {
    try {
        var unicornJson = objectMapper.writeValueAsString(unicorn);
        logger.info("Publishing ... " +  unicornEventType.toString());
        logger.info(unicornJson);

        var eventsRequest = createEventRequestEntry(unicornEventType, unicornJson);
        eventBridgeClient.putEvents(eventsRequest).get();
    } catch (JsonProcessingException e) {
        logger.error("Error JsonProcessingException ...");
        logger.error(e.getMessage());
    } catch (EventBridgeException | ExecutionException | InterruptedException e) {
        logger.error("Error EventBridgeException | ExecutionException ...");
        logger.error(e.getMessage());
    }
}
Conclusion
In this section you got an overview about the Java Application which will be used during the workshop. You can now proceed with Building and Running Container Images with Java Application Using Docker.